Build HTML5 WebGL Games with Babylon.GameFX
We’ve recently released a simple & powerful WebGL 3D engine named Babylon.JS: a complete JavaScript framework for building 3D games with HTML 5 and WebGL While he was writing his engine, we’ve built a small team made of Pierre Lagarde, Sébastien Pertus, Michel Rousseau and I to imagine a framework on top of Babylon.JS to help developers building games in a very simple way. This framework is named Babylon.GameFX and mainly targets people that are not very comfortable with some 3d gaming concepts and don’t consider themselves as 3d gurus. But it could be useful also for more advanced developers as we’ve tried to implement some boring tasks for you also. By the way, if you’re a 3d beginner, you should have a look to this series: Tutorial series: learning how to write a 3D soft engine from scratch in C#, TypeScript or JavaScript
Pierre and I have just finished a v0.1 of the client part. You can download it from Github: BabylonJS.GameFX & you can find some simple samples on our website: http://gamefx.babylonjs.com/
Sébastien has almost finished a back-end set of APIs to help you handling a leaderboard in a near future. We’ll then talk only about the client part here.
By the way, please note that we’re mainly working on this framework on our part time and that v0.1 means that this is far from being completed. So, please be kind with us if everything is not perfect yet :) But we’d like to start sharing with you what we’ve done so far, listen to your feedbacks and continue/enhance it in the next weeks. We will then iterate with your feedbacks in the next releases.
In this first tutorial, we’re going to see how to use the main features we’ve shipped. By following this tutorial, you’ll be able to create the following result in less than 30 lines of code:

— or click here: open Babylon.GameFX first tutorial demo in a separate window —
Use the keyboard to control the ship, if you have a touch screen touching the left part will display a virtual cyan touch joystick to control the same ship and touching the right part will display a yellow joystick to control the enemy. The joysticks can be controlled with your mouse also. Please also have a look to this sample: controlling the camera with 2 virtual touch joysticks. It takes the same 3d objects and let you move the camera around these 2 awesome meshes thanks to your finger.
If you don’t have a touch screen or a WebGL compatible browser, have a look to these 2 videos instead:
Ok, let’s now see how simple it is to build such cool games.
What are the features in the v0.1?
You’ll see that we’re already handling a lot of tasks for you. The idea is to take default decisions that would match 80% of what you would probably like to do in your game. We’re hiding a lot of the complexity. Of course, a possible drawback is that you won’t be able to do exactly what you want with our framework by default. But this is not a very big problem as you can override most of the default decisions we’ve made. And it’s JavaScript: you can do whatever you want to tweak it! ;-)
The framework currently includes the following features’ list:
– a game world/assets manager/game entities concepts to abstract most of the BabylonJS complexity. They will handle the async loading, the initialization of the BabylonJS engine, the gaming loop, the collisions between the game entities and so so. – a keyboard manager that will control a specific game entity with a default inertia algorithm setup. – a virtual touch joystick that will be able to control a specific game entity or to control the camera of the game (for FPS like games)
We’re going to have a first contact with those features in this tutorial.
You’ll see also that we’re creating a default camera & a default light for you. You can then start learning 3D concepts in a simple way and change our default parameters to really match your inspiration later on.
Creating your first Babylon.GameFX game
Minimum structure needed
To create your first game, you’ll need to download the Babylon.JS framework and the Babylon.GameFX framework from Github. Then, you classically need a basic HTML document:
<!DOCTYPE html>

<html>

<head>

<title>Introduction Tutorial to Babylon.GameFX for WebGL games</title>

<link href="index.css" rel="stylesheet" />

<!-- BABYLON 3D ENGINE REFERENCES -->

<script src="/babylon.js"></script>

<!-- BABYLON GAMEFX ENGINE REFERENCES -->

<script src="/GameFX/hand-1.0.14.js"></script>

<script src="/GameFX/babylon.gamefx.collection.js"></script>

<script src="/GameFX/babylon.gamefx.keyboardmanager.js"></script>

<script src="/GameFX/babylon.gamefx.virtualjoystick.js"></script>

<script src="/GameFX/babylon.gamefx.assetsmanager.js"></script>

<script src="/GameFX/babylon.gamefx.dashboard.js"></script>

<script src="/GameFX/babylon.gamefx.gameworld.js"></script>

<script src="/GameFX/babylon.gamefx.gameentity.js"></script>

<script src="/GameFX/babylon.gamefx.gameentity3D.js"></script>

<!-- YOUR GAME LOGIC REFERENCES -->

<script src="./js/tutorial_001.game.js"></script>

</head>

<body>

<canvas id="renderCanvas"></canvas>

<div id="loadingText" class="loadingText"></div>

</body>

</html>
Please download also this basic CSS stylesheet: index.css
Let’s play with the framework
First download the assets here: Omega Crusher Assets and unzip them in an “assets†folder. They will act as our 3D content for this tutorial.
Then, create a tutorial_001.game.js file and copy/paste this first JS code:
var ship;

var gameWorld;

document.addEventListener("DOMContentLoaded", initializeGame);

function initializeGame() {

gameWorld = new BABYLON.GameFX.GameWorld("renderCanvas");

}
You’re creating here a new instance of the GameWorld object. You just need to provide him the id of the canvas where you’d like to render your game. It will then initialize the BabylonJS 3D engine, create a default camera and light for you and expose a series of services we’ll see later on.
Tip: you can of course develop your game with our framework with any of your favorite IDE. It’s web development. But if you choose Visual Studio, you can boost your productivity with IntelliSense easily. If you’d like to test it, you can download this free version : Visual Studio Express 2013 Preview for Web. Then, simply add this special comment at the beginning of your JS file to indicate the linked resources:
/// <reference path="/GameFX/babylon.gamefx.gameworld.js" />

/// <reference path="/GameFX/babylon.gamefx.gameentity3D.js" />
And now, here is the kind of help Visual Studio will bring you:
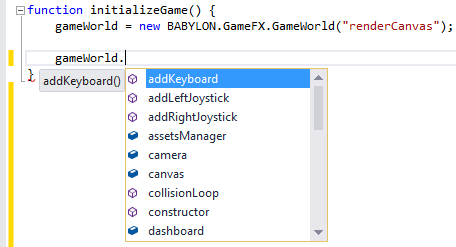
It’s really useful to discover a new framework!
GameEntity3D
We’re now going to use the GameEntity3D object to load a specific mesh from a .babylon file. Let review it through a simple code sample:
function initializeGame() {

gameWorld = new BABYLON.GameFX.GameWorld("renderCanvas");

var initialShipPosition = new BABYLON.Vector3(0, 0, 10);

var initialShipScaling = new BABYLON.Vector3(0.1, 0.1, 0.1);

var initialShipRotation = new BABYLON.Vector3(0, 0, 0);

ship = new BABYLON.GameFX.GameEntity3D("Vaisseau", "./assets/", "OmegaCrusher.babylon",

initialShipPosition, initialShipRotation, initialShipScaling,

false, gameWorld);

// Push all the GameEntity3D objects you'll need during your game in the assetsManager collection

gameWorld.assetsManager.push(ship);

// Then request to load all these entities, you'll be call-backed once the loading will be done

gameWorld.assetsManager.loadAllEntitiesAsync(startGame);

}

// Assets have been loaded, we can start the game

function startGame() {

// remove the loading screen, otherwise you won't see your game!

gameWorld.dashboard.endLoading();

}
The GameEntity3D are looking for the following parameters:
– the name of the entity to load from the .babylon file (here it’s “Vaisseauâ€). – the directory to load from – the name of the file in the .babylon format containing the asset you’d like to load – the position, rotation & scaling details using BABYLON.Vector3 objects – a boolean indicating if this mesh has to be loaded to be cloned later on (true) or should we load it immediately & display it (false) – the instance of the GameFX.GameWorld you’ve created before
Create as many GameEntity3D instances you need to. Then, push them into the assetsManager collection. You’re then indicating all the resources you’ll need in your game. They can all come from the same .babylon file or from different files. Finally, to request the loading and to start the asynchronous operation, call the loadAllEntitiesAsync function and pass it a callback function (startGame here).
Finally, call the endLoading function on the dashboard object to say you’re ready to display & play to your game. It will remove the loading screen and show your wonderful 3D world.
Here’s a link demonstrating this first result: http://david.blob.core.windows.net/babylongamefx/introtutorial/part1/index.html
You can see in this sample the 3d mesh of a game we’re working on. It’s the main ship of Omega Crusher and has been designed by our lovely Michel Rousseau.
This is cool but you can’t play with the ship yet.
Keyboard & gaming loop
Default behavior
Let’s now move the ship with the keyboard. The GameFX exposes a KeyboardManager that will do a lot of the magic for you. Let’s see how simple it is to use it via this sample code:
function startGame() {

gameWorld.addKeyboard().connectTo(ship);

// if you don't start the main game loop, nothing will happen

gameWorld.startGameLoop();

// remove the loading screen, otherwise you won't see your game!

gameWorld.dashboard.endLoading();

}
Well, I hope that this code is pretty obvious as it was designed to be! :) You see that you only need 1 line of code to create a keyboard and to connect it to one of your gaming entities. By default, the keyboard will listen to the left/right/up/down keys to control the X & Y axis of the position of the entity in the 3D world.
You need to explicitly start the game loop to make this keyboard works as expected. The GameWorld object contains a main game loop for you. This game loop check if you’ve got a keyboard defined and/or some virtual joysticks to ask them to do their job. It also contains logic to handle some collisions between your gaming entities.
Here is the result after adding these 2 new lines of code to the previous sample: http://david.blob.core.windows.net/babylongamefx/introtutorial/part2/index.html
Simply move the ship up & down and left & right using the arrow keys.
Setting borders
You see that the ship can disappear from the 2d window view point. This is normal as we’re moving in an infinite 3d world. If you’d like to block the move to specific X, Y or Z values, you can set those values through setMinMaxX, setMinMaxY or setMinMaxZ.
But how to know the X or Y values to stop at to avoid the ship getting out of the 2d window of the current screen? Call getVirtual2DWindowOnZ(value).
Indeed, those values depends on the distance (depth) where the mesh is living from the camera. By default, the camera lives at 0, 0, –30. In the first sample code, we’ve set the position of the ship to 0, 0, 10. In conclusion, the ship lives at 40 from the camera on the Z axis.
Add these lines of code:
var borders = gameWorld.getVirtual2DWindowOnZ(40);

gameWorld.Keyboard.setMinMaxX(borders.top.x, borders.bottom.x);

gameWorld.Keyboard.setMinMaxY(borders.top.y, borders.bottom.y);
View the result in your browser here: http://david.blob.core.windows.net/babylongamefx/introtutorial/part3/index.html
You’ll see also that the KeyboardManager adds some default inertia to the movements. It brings more natural animations.
Overriding some of the default behaviors
What if you’d like now to change the default behavior? For instance, if you’d like to control the Z axis with up & down keys? Or change the up & down keys to map them to other keycodes?
Using the previous demo, if you’d like the control the Z axis on up/down arrow keys, add this line of code:
gameWorld.Keyboard.setAxisForUD("Z");
The equivalent for left/right is setAxisForLR. If you’d like to inverse the controls on up/down, use this one:
gameWorld.Keyboard.reverseUpDown = true;
The equivalent for left/right is reverseLeftRight. If you’d like to change the up/down/left/right actions to other keys, use this line of code:
// map to Q,Z,D,S in AZERTY.

gameWorld.Keyboard.setBasicKeysCodes(81, 90, 68, 83);
If you’d like to customize what the keyboard is doing on your game entity, you’ve got 2 options:
1 – completely override the default behavior (moving the entity with inertia) to your own code 2 – keep the default behavior and add your logic executed just after that
Let change for instance what’s being done on the left key, use that:
gameWorld.Keyboard.setKeysBehaviors([{

key: "left",

associatedBehavior: function () {

console.log("myCustomLogicForLeft");

}, addLogic: false

}]);
Just using this line, you will just override the left key. It won’t move your entity anymore but will call the code of the function passed to the associatedBehavior parameter.
If you’d just like to add some logic, use rather that instead:
gameWorld.Keyboard.setKeysBehaviors([{

key: "left",

associatedBehavior: function () {

console.log("myAdditionnalCustomLogicForLeft");

}, addLogic: true

}]);
Your entity will still move with the left key but the KeyboardManager will also call your additional logic contained in the function passed.
Rotating on the axis relative to the 3d mesh
Currently, when we’re moving, we’re using the axis defined by the world containing all our assets. But you can change that to ask to rotate on the axis relative to the mesh/game entity itself instead.
For that simply call the activateRotationOnAxisRelativeToMesh() function.
You can test a sample rotating on X and Z via the keyboard’s arrow keys here: http://david.blob.core.windows.net/babylongamefx/introtutorial/part4/index.html
If you need to come back to default behavior, call the activateMoveOnAxisRelativeToWorld() function.
Virtual Joysticks
The VirtualJoystick logic is creating a touch-enabled analogic-like joystick for phones, tablets and any kind of touch devices like Windows 8.1/RT machines. It uses our HandJS polyfill to be compatible with all implementations of various touch specifications (Pointer Events and Touch Events). It’s based on the job I’ve already done before here: Creating an universal virtual touch joystick working for all Touch models thanks to Hand.JS
The VirtualJoystick is exposing all the same functions and behaviors as the KeyboardManager. You can create 2 virtual joysticks maximum, one living on the left of the screen & one living on the right. It’s very simple to use and will work on all touch devices!
Let’s review its usage via a simple sample. We’re going to load 3 meshes : the same ship as before, an enemy and a sphere that will act as a sky dome. We’re going to declare a left virtual joystick that controls the main ship with some X & Y borders limits and a right virtual joystick that will control the enemy on the X axis on left/right and on the Z axis on up/down. The left joystick will be cyan (the default color) and the right one will be yellow. This will then build the sample you’ve seen at the beginning of this article.
To do that, you need exactly 28 lines of code:
var ship;

var enemy;

var gameWorld;

document.addEventListener("DOMContentLoaded", initializeGame); function initializeGame() {

gameWorld = new BABYLON.GameFX.GameWorld("renderCanvas");

ship = new BABYLON.GameFX.GameEntity3D("Vaisseau", "./assets/", "OmegaCrusher.babylon",

new BABYLON.Vector3(-20, 0, 10),

new BABYLON.Vector3(0, 0, 0),

new BABYLON.Vector3(0.1, 0.1, 0.1),

false, gameWorld);

enemy = new BABYLON.GameFX.GameEntity3D("Ennemi1", "./assets/", "OmegaCrusher.babylon",

new BABYLON.Vector3(20, 0, 10),

new BABYLON.Vector3(0, 0, 0),

new BABYLON.Vector3(0.1, 0.1, 0.1),

false, gameWorld);

var sky = new BABYLON.GameFX.GameEntity3D("Ciel", "./assets/", "OmegaCrusher.babylon",

new BABYLON.Vector3(0, 0, 100),

new BABYLON.Vector3(0, 0, 0),

new BABYLON.Vector3(1, 1, 1),

false, gameWorld);

// Push all the GameEntity3D objects you'll need during your game in the assetsManager collection

gameWorld.assetsManager.push(ship);

gameWorld.assetsManager.push(enemy);

gameWorld.assetsManager.push(sky);

// Then request to load all these entities, you'll be call-backed once the loading will be done

gameWorld.assetsManager.loadAllEntitiesAsync(startGame);

}

// Assets have been loaded, we can start the game

function startGame() {

var borders = gameWorld.getVirtual2DWindowOnZ(40);

gameWorld.addKeyboard().connectTo(ship);

gameWorld.Keyboard.setMinMaxX(borders.top.x, borders.bottom.x);

gameWorld.Keyboard.setMinMaxY(borders.top.y, borders.bottom.y);

gameWorld.addLeftJoystick().connectTo(ship);

gameWorld.LeftJoystick.setMinMaxX(borders.top.x, borders.bottom.x);

gameWorld.LeftJoystick.setMinMaxY(borders.top.y, borders.bottom.y);

gameWorld.addRightJoystick().connectTo(enemy);

gameWorld.RightJoystick.setAxisForUD("Z");

gameWorld.RightJoystick.setMinMaxX(borders.top.x, borders.bottom.x);

gameWorld.RightJoystick.setMinMaxZ(5, 50);

gameWorld.RightJoystick.setJoystickColor("yellow");

// if you don't start the main game loop, nothing will happen

gameWorld.startGameLoop();

// remove the loading screen, otherwise you won't see your game!

gameWorld.dashboard.endLoading();

}
You can test the result directly in your browser here: http://david.blob.core.windows.net/babylongamefx/introtutorial/part5/index.html
Use your fingers or a mouse to activate the virtual joysticks.
Finally, if you’d like to control the camera with 2 virtual joysticks like the second video you may have seen at the beginning, it’s just 2 lines of code:
gameWorld.addLeftJoystick().connectTo(gameWorld.camera);

gameWorld.addRightJoystick().connectTo(gameWorld.camera);
And you’re done! Isn’t that cool? ;-) You can test this sample here: controlling the camera with 2 virtual touch joysticks
We’re done for this first introduction to Babylon.GameFX. We’ve not completely covered everything but I hope you’ll get the philosophy behind our framework: simplicity.
This article is part of the HTML5 tech series from the Internet Explorer team. Try-out the concepts in this article with free virtual machines @ http://modern.IE.