Global Composite Operations – Your Canvas Utility Belt
This article recently appeared on BuildNewGames.com, a collaboration by the teams at Bocoup and Internet Explorer.
The past year has seen wonderful growth in the popularity of 2D Canvas; it’s been great to see so many people getting comfortable with the 2D context. Canvas is almost synonymous with HTML5 gaming and supported in all modern browsers including Chrome, Firefox, and Internet Explorer 10 and 9.
One thing that many people take for granted is the “bottom to top†canvas drawing order; putting down the background first, then objects in the middle of the scene, and finally drawing the foreground.
It’s true that this is how canvas works by default, and there’s a specific name for it; it’s called the source-over global composite operation (GCO).
What many people don’t know is that you can reverse this order – by setting ctx.globalCompositeOperation = destination-over, you can actually draw the background last, and it will go under what’s already been drawn on your canvas.
There are a total of eleven total GCOs at your disposal. There used to be an even dozen, but the black sheep of the bunch – darker – has unfortunately been abandoned.
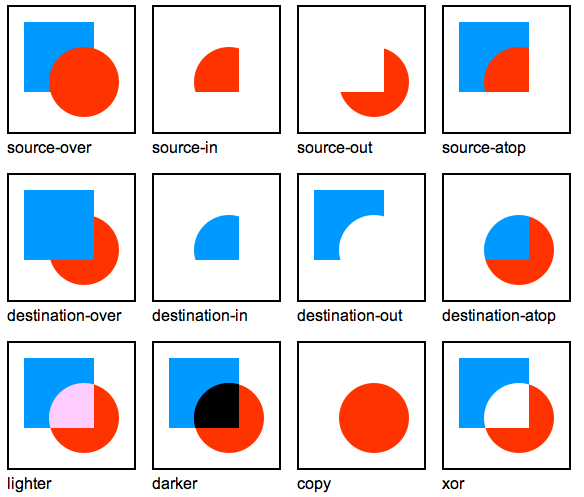
Canvas Global Composite Operations
In general, you should use source-atop, because it has been the focus of much optimization and is relatively fast. However, there are times when the scene you’re trying to create is difficult or impossible to pull off with source-atop alone.
The GCO modes apply to every pixel that goes onto the canvas. Whether drawn via fillRect, stroke, drawImage, fillText, or anything else – they are all subject to the active GCO. Happily, as the GCO is set on the canvas context, it is subject to the same save/restore (push/pop) behavior as all the other contextual fields (scale, rotation, fill style, global alpha, etc).
This article will explore two of the lesser known GCOs – source-atop and destination-out – and show how they can help you solve some common problems in game graphics programming.
Subtractive Drawing with destination-out
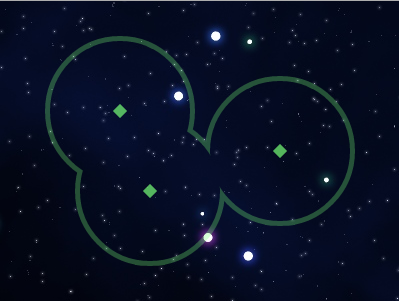
A recent problem I faced was the display of a number of control points on a strategic map. Each point provides a circular “radar†area of effect, and I wanted to depict this area visually so it was obvious to the player which areas were under the effect, and which were not.
The obvious choice to illustrate the radar area border is a simple line – a colored ring around each control point. This is very easy to do with canvas: create a few paths with the .arc() method, and stroke each one.
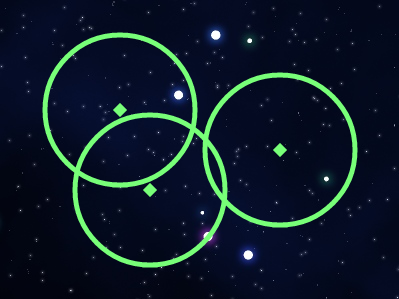
However, this can get rather ugly and cluttered, especially as the number of overlapping control points ramps up. It would be much cleaner if we could prevent the rings from overlapping; we don’t want the border lines to be drawn in the interior of the territory; we only want a series of curved lines around the boundaries.
One approach to this problem is to create a complex path of semicircles out of a series of arcs and stroking it, like this:
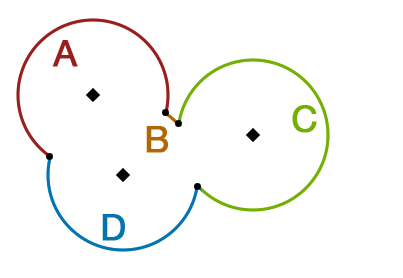
Each arc (A, B, C, and D) could be added in series, and stroked in one shot. However, this presents a few problems:
- Finding the intersection between each circle
- Identifying the segments between the intersections
- Converting them into arc() calls, which require a center, a radius, and two angles
My head is spinning just trying to imagine the math needed to pull this off with arcs. What we really want to do is to fill in a bunch of circles, and then “hollow out†the insides of the circles, leaving the remaining border. I’m not sure what the industry term for this is – I’ve been calling it a “subtractive brushâ€.
In the handy template for destination-out, we see our trusty blue rectangle, but with a circle-shaped bite taken out of it. Rather than draw the red circle, the canvas took the new shape (the “sourceâ€) out of the destination – leaving behind pure transparency.
This makes drawing the territory border a simple three-step process:
- 1. Fill all the circles
- 2. ctx.globalCompositeOperation = “destination-out”;
- 3. Fill all the circles again, at a slightly smaller radius
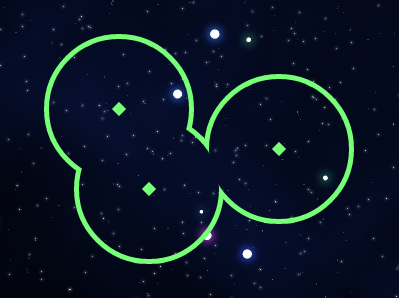
Note that our looping is a bit less efficient this time through; we do one loop to do the initial filled circles, a second loop to hollow them out, and a third loop to draw the diagonal control point markers. This pattern – looping through your game objects multiple times based on the type of drawing being done – is one I’ve encountered quite a bit when trying to optimize graphics. I figure it comes with the territory – procedural coding for procedural operations.
In any event, this “fill, then hollow†approach scales very well – we could have several dozen control points, and the shape would be exactly the one we want, without any complicated trigonometry.
There’s just one catch; what if we want to make things a bit more subtle, and draw our border shape at 30% opacity?

jsfiddle – Transparent Hollowed Circles, With Overlap Artifacts
Suddenly, we can see higher opacity fragments where the rings overlap each other. The more rings that overlap in close proximity, the more annoying this will be. Not what we want at all!
Fortunately, destination-out can help us here too. Extending our process above:
- 1. Fill all the circles at 100% opacity
- 2. ctx.globalCompositeOperation = “destination-out”;
- 3. Fill all the circles again at 100% opacity, at a slightly smaller radius
- 4. Draw a 50% opacity rectangle over the whole shape with destination-out
That’s right – destination-out respects transparency, allowing you to subtract partial opacity from a shape. When I visualize this, I imagine a 100% opaque red square on my canvas as a red cube 100 units tall, and then I can shave off some of those units of red by drawing a partial-opacity shape with destination-out.
jsfiddle – Transparent Hollowed Circles, No Overlap Artifacts
The result is exactly what we want – subtle, 30% opacity rings, with no unintended opacity where they overlap.
It’s worth noting that destination-out can only be used to subtract opacity (alpha channel) off of the canvas. It can’t be used to shave off color channels, for example by filling a purple square, and subtracting out the red from part of it. The color of the destination-out fill has no effect; only the opacity of the source draw is taken into consideration for the end result.
Colored Sprite Masks with source-atop
A player’s sprite is an important piece of a game’s art – we want them to forge an emotional connection with the sprite and feel a sense of investment in it. When designing the ship sprites for Drone Age, I wanted to allow for some visual personalization; for example, letting the player choose a primary and secondary color, perhaps even changing the texture of the ship.
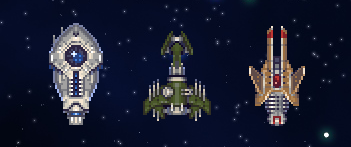
Three ships from Drone Age: Juggernaut, Infiltrator, and Cobra
One thing I wanted to avoid was having to cut separate graphics for each combination; if we had 12 different ship types with 10 primary colors and 15 secondary colors, we’d be looking at over 1800 sprites in our sheet; inefficient for both the artist and the web browser. This sort of top-down approach also complicates future growth; if we want to add 5 new ships down the road, we’d need to revisit our spritesheet, revisit the code that specifies spritesheet coordinates, etc.
Instead, I wanted a way to be able to programmatically combine colors, textures, and base images into a customizable end image. I was also trying to avoid using getImageData() and setImageData() to read and write individual pixels because of their slow performance and generally cumbersome nature.
Happily, I stumbled across the source-atop GCO. source-atop takes the source shape or image you are trying to draw, and draws it only where there is already opacity on the canvas.
For example, if your destination contains a wide diagonal line with antialiased edges, the diagonal edge’s partial transparency will be preserved when drawn upon, but the colors will be changed reflect those of the incoming source.
In other words, source-atop replaces the colors in the destination, but the opacity values will remain unchanged.
Source transparency is also respected; if your source has only 50% opacity, you’ll still see 50% of the underlying destination.
This behavior provides us with an ability similar to how we’d use a “layer mask†in Photoshop. We can combine an uncolored sprite image (with transparency at the edges of the sprite) with a colored, semi-opaque rectangle, resulting in a colored version of the sprite.
However, coloring our Cobra sprite in one single color isn’t going to look too impressive:
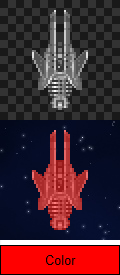
jsfiddle – Monochrome Sprite Coloring
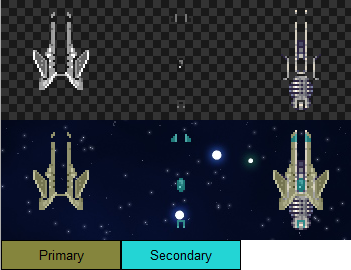
We just want the player to customize some parts of the sprite. To do this, I took the same Cobra sprite from above, and used Photoshop to split it into multiple “sub-sprites†– one “primary†colorable PNG, one “secondary†colorable PNG, and one “base†PNG that is not user-colorable.
The primary and secondary sub-sprites have been totally “desaturatedâ€; all color has been removed – making them grayscale. We’ve also boosted the contrast level – this is to compensate for the fact that we’ll be putting a flat 50% color atop these images, and will lose some contrast as a result.
To colorize the subsprites and merge them all together, we need three canvases – one to colorize the primary, one to colorize the secondary, and one to merge them all together.
jsfiddle – Complex Sprite Coloring
This looks pretty solid; we’re giving the player some creative, personal control over their ship’s appearance; but still keeping a reign on the overall look and quality of the art by limiting that control to specific regions.
Rather than drawing a flat colored rectangle, we could instead use a gradient to color the subsprite, or even a textured image (such as camouflage). That said, I’ve found that mixing textures and sprites can lead to some unintended bright / dark spots; if you can get by with flat color customization, it’ll probably save you some headaches to do so.
In any scenario where you are processing images with canvas, you have to be cogniscent of DOM Security Errors.
For example, the above code could use some more direct techniques to move the merged image back into view, for example by using canvas.toDataURL(). However, because the images originated from a different host than the one the served the page, this triggers a DOM Security Exception.
This problem occurs quite a bit when moving images on and off the canvas. For local development, it’s best to set up a copy of Apache on your local work directory; and for production, when possible, it’s best to serve all assets (images, js, server-side code, etc.) off the same host.
Wrapping Up
While canvas provides 11 GCO’s, many of them are related; kind of like evil twins. Revisiting the diagram:
Canvas Global Composite Operations
destination-atop provides equivalent but opposite functionality to source-atop, and source-out provides the same for destination-out.
We also talked about source-over (the super-speedy, back-to-front default) and destination-over (for when you really, really need to slip something under your scene).
lighter is my personal favorite, and unlocks the possibility of amazing additive particle effects, and darker would be awesome for smoke effects if it hadn’t been removed from the spec!
source-in, source-out, destination-in and destination-out all seem to do the same thing – a simple mask operation – but I haven’t found a use for any of them yet.
copy is one I just don’t get – since it discards what was on the canvas before, perhaps it’s just a speed shortcut for clearing it.
Finally, the wildcard, xor – if you’ve done something cool or noteworthy with it, please let me know about it!
Thanks for reading, and if you’re interested in strategic space combat on 2D canvas, be sure to check out Drone Age at http://droneage.com
Further Reading
Michael Deal’s Chromatic GCO Tests
Mike Rekim’s GCO Browser Support Matrix (outdated but still useful)
Beej Jorgensen’s “source-atop†Canvas Scratch-off Demo
How to choose between SVG and Canvas
Malcom Sheridan’s Developer’s Guide to HTML5 Canvas
About the Author
Glenn is a dad, musician, artist, and software enthusiast using CouchDB, JavaScript, Java and iOS. He is the director of Interface Tech at Communispace.com